Visit Rebecca in the Studio!

Seattle independent filmmaker Aaron Bourget has edited a video from a recent visit to the painting studio.

It’s difficult to be in front of a camera (especially when 6 months pregnant!) and Aaron really helped make me feel more comfortable. I hope you enjoy this glimpse into what’s hanging in the studio, and what I’m working on!

Thank you Aaron!

Packing November’s Reclining Rabbit Painting for her Cross Country Journey

Reclining Rabbit oil painting miniature by Rebecca Luncan

Reclining Rabbit – November 2015, oil on aluminum, 4.25″ x 3.25″

I’m a huge fan of miniature artwork, and the ease and affordability of shipping them safely is one reason why.

Miniature paintings are great for so many reasons. They are intimate and powerful, easy to hang in any house, and much more affordable to commission than larger works (even with a custom, hand-finished frame).

And while miniature paintings are cheaper and easier to ship than larger artwork, they also need some special treatment.

Medium-sized paintings typically ship wrapped in plastic and 2″ of bubble wrap surrounded in a cardboard exterior . That will normally be enough for small miniatures as well, but because the packages are small, they are more likely to get tossed around, stacked, and generally treated roughly.

Years of working in a museum have trained me to go the extra mile in prepping artwork for shipping.

Here’s how I packaged this miniature painting to ship across the country to her new home.

Art packing materials

Art packing materials

Materials

  • 2.25″ grey foam *sub wadded brown paper for more environmentally friendly packing
  • Ethafoam (Styrofoam can also be used) the thickness of the artwork (you can glue multiple layers together)
  • plastic bag (polyethylene or food grade)
  • tape measure
  • packing tape
  • straight edge
  • “fragile” sticker
  • utility knife (I like Olfa)
  • cardboard (box)

Step-by-Step

  1. Determine what size box is needed. Measure the painting and add 4″ to get the length and width. Stack your grey foam, Ethafoam and one layer of cardboard, then measure to get your box’s ideal height. *I’ve been subbing brown paper for the grey foam more recently to make my packing materials more environmentally friendly. If you do this, leave two inches of space for both above and below your artwork and use double thick cardboard. Add a second layer of cardboard under your artwork.
  2. Find or cut out the box. A box that is within a few inches (but at least 2″ larger on all sides)of the painting is ideal. The height should be trimmed to fit the height of the foam exactly. If you don’t have a box handy, you can make your own: the image above shows how you would cut a box from a flat piece of cardboard. To get the creases for the bends, use a bone scorer or completely retract the blade on the utility knife and use the (dull) metal edge. Tape the bottom of the box together.
  3. Cut each piece of foam and cardboard to fit. I also like to take out a corner notch in the top layers to make unpacking a little easier. My favorite knife is the Olfa utility knife with a 25mm blade. Fantastic knife for cutting foam (and everything else). Make sure to keep your fingers out of the way of the blade, these knives are incredibly sharp!
  4. Cut a hole in the Ethafoam that will snugly fit the painting.
  5. Wrap the painting in plastic, making sure to seal theedges completely and that the surface of the painting does not come into contact with the plastic. If the painting is unframed and very dry, wrapwith Dartek first, then plastic.
  6. Phew! Everything’s cut and now it’s time to put it all together.
Packing miniature paintings, step by step

Packing miniature paintings, step by step

7. Remember to add the packing slip and a thank you note, then say your goodbyes and seal it all up. Make it official with a fragile sticker, and it’s ready to post out to it’s new home!

Ship-Finished

If you’re interested in receiving your very own hand painted miniature, contact the artist to commission one just for you or sign up for the monthly newsletter for a preview of the newest painting up for sale!

September Miniature Painting, Life with Rabbits in the Studio

Studio Rabbits, oil painting by Rebecca Luncan

Studio Rabbits – September 2015, oil on aluminum, 5.25″ x 3.75″

A glimpse into the artist’s studio, halfway through the “Monthly Miniature – Rabbits” series

I live on a quarter acre just north of Seattle and this is where you’ll find my studio, in a converted garage at my house. I love having company in the studio while I paint, and some of that company is very furry. My dog Mona curls up neatly behind me and keeps me warm (it can get chilly in Seattle), and rabbits Charlie and Ellie lie on the rug at my feet. It’s a good thing I wear grubby painting clothes anyway, because the rabbits nip at my pant legs to remind me when it’s dinner time. There are plants and birds to see out windows on two sides. Today there are stellar jays feeding on sunflowers.

Though they have the run of the house, the rabbits spend most of their time in the studio. When not under my desk, Ellie naps in her favorite blue chair. Charlie likes to flop on his side on a rug near the wall. And they both like to sit in the windowsill looking out. I love when I’m picking strawberries in the front yard, and I hear people walking by exclaiming, “Oh my gosh, there’s a rabbit in the window!” Sometimes I open the back door and let them roam the yard, but Ellie has become a cunning escape artist, so they’re on house arrest until the yard is better secured. It would also help if the neighbor behind us could resist tempting them with carrot treats.

At 17′ x 24′ it’s a big space for someone working so small, but it’s very full of framing supplies and tools, painting and drawing supplies, lots of art books, and printers. The walls are lined with finished paintings and works in progress. I usually have around six paintings at various stages of completion, in addition to handpicked frames and prepared metal surfaces for at least 20 more. In this month’s “Studio Rabbits” painting, you can see three paintings from my “Open, Closed, Away” series hanging in the background.

I finally convinced my soon-to-be husband (and editor, web developer and photographer) to move his office from a spare room to a corner of the space in here. It’s a big room, and he doesn’t seem to mind having a giant mat/glass cutter mounted to the wall in his area. So far it has been working great, but I hope we’ll be able to keep it warm enough in the winter. My little space heater can only do so much! But we’ll figure that out when the time comes. The bottom of his pants are as yet mostly intact. (There’s a cozy rug under my desk, and I give them more treats.)


Signing Artwork: Making Ties to the Past

signature

A piece of artwork has two identities; a signature binds the one to the other.

The first identity is the object, there in front of you, awaiting your gaze. The reckless or the deliberate brushstrokes, the smooth sheen on a carefully sculpted piece of marble, the lovely hatch-marks on an etching, all the little details that pull you in and make each piece of artwork unique. The second identity is the story of the artwork and its journey through the world. Who made it? Why? Where was it exhibited? Was it part of a bigger series? Who is the person in the portrait? and who has owned it? This story is called the provenance.

Like it or not, a work of art does not stand completely on its own: both its story and its physical character are important. Some degree of provenance helps work keep its value over time, and more valued work is more likely to be well-treated. But until artwork is identified, it effectively has little provenance. When someone is faced with a decision about what to do with a piece of art, the identity of its creator is important. So to make it more likely your work will be treated well, found and remembered, it is important to sign it clearly. Alan Bamberger is, among other things, an art consultant and independent appraiser specializing in original works of art. His article about artist’s signing artwork goes as far as saying, “No matter what your signature looks like, what form it takes or where you put it, no work of your art is complete without one.”

Where to Sign? and Other Guidelines

Where to sign artwork is the most debated part of the process. Painter Alice Neel did a huge signature and the date on the front of her paintings, but you’d never see a Georgia O’Keeffe signed on the front. Hers were restricted to the back, either on the canvas or stretcher frame. I was taught in art school to sign paintings on the back so it doesn’t take attention away from the artwork. That’s only one school of thought, but it’s how I’ve done it since then.

I do have one patron that likes me to sign paintings on the front, and at her request, I’ve been signing paintings she’s purchased that way. I try to hide the signature a bit and it’s starting me questioning whether or not I should hide a little signature on the front on all of them. It always seems so glaringly obvious to me, but when I just showed a friend one piece, he had to get out a magnifying glass to find it, so maybe it isn’t so distracting after all. I’m going to do a little experimenting, so keep your magnifying glasses at the ready.

Other things to consider:

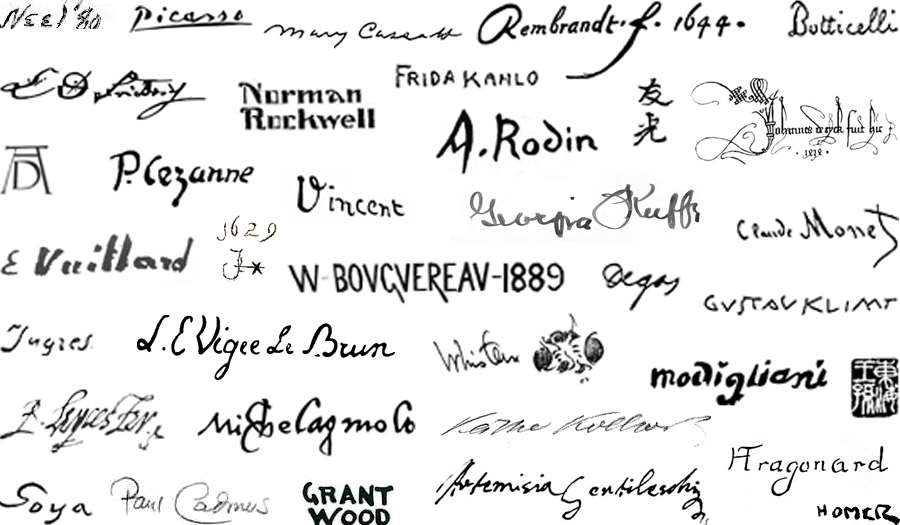
  • If your signature isn’t legible, why bother? Note that even the well known artists in the image above have pretty clear signatures. There are websites dedicated to identifying paintings with illegible signatures (and they are not always successful).
  • Keeping the look and placement of your signature consistent makes it easier to locate.
  • Paintings and drawings are easier to authenticate if the signature is done in the same medium as the artwork.
  • Your name may change. Consistency is important, but you just do the best you can do. It seemed like a good idea to go by Rebecca Raven after I got married, but going back to my maiden name after getting divorced means there are 9 years worth of little painting out in the world without my name on them! If you see a Rebecca Raven out in the world, you’re welcome to contact me and I’ll be happy to verify if for you. I keep excellent records.

Interesting Signatures

Signatures take many forms, from a simple hand-written or painted signature to pictographs or monograms; a traditional method of signature in China and Japan is to stamp artwork with a personal seal (a chop). Signatures themselves can have their own stories, and can be a reminder of the artist’s life and times. Here are two signatures that I found particularly interesting.

Whistler’s signature made an interesting transformation into the image of a butterfly, inspired by his studies of the artists “chops” found in Asian artwork, which was flooding Europe after Japan became open to trade in 1854. He sometimes hides the butterfly in unexpected places, such as the frame on the painting. Both the early and late versions of his signature are shown next to each other in the image above.

Joseph Cornell (not pictured above) presented me with a mystery. I’ve had the privilege to handle dozens of his pieces in my mount-making capacity at the Seattle Art Museum, and noticed many pieces attributed to him are signed, Robert Cornell. With the help of Wikipedia, I discovered that this Robert was Joseph’s younger brother who was disabled and had cerebral palsy. Though I never learned the exact significance of the signature, I was touched to learn that the artist devoted his life to caring for his little brother.

A Good Read About Provenance

content

I’m just finished reading a beautiful family memoir that I highly recommend called, The Hare with Amber Eyes: a Hidden Inheritance by Edmund de Waal. The author “traces the collection (of small Japanese sculpture called netsuke) from Japan to Europe…and back to Japan and Europe again”. It’s a profound take on provenance, and how much the things around us, that we invite into our homes, can become intertwined with our own histories.