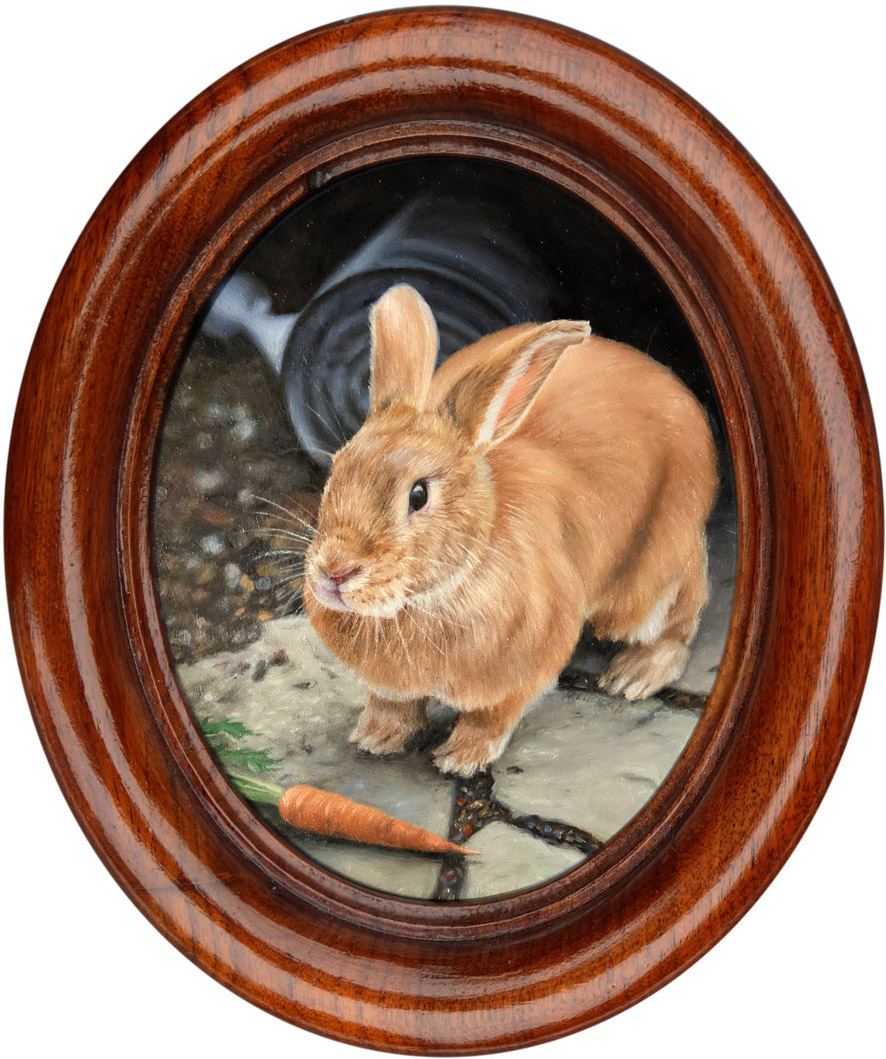
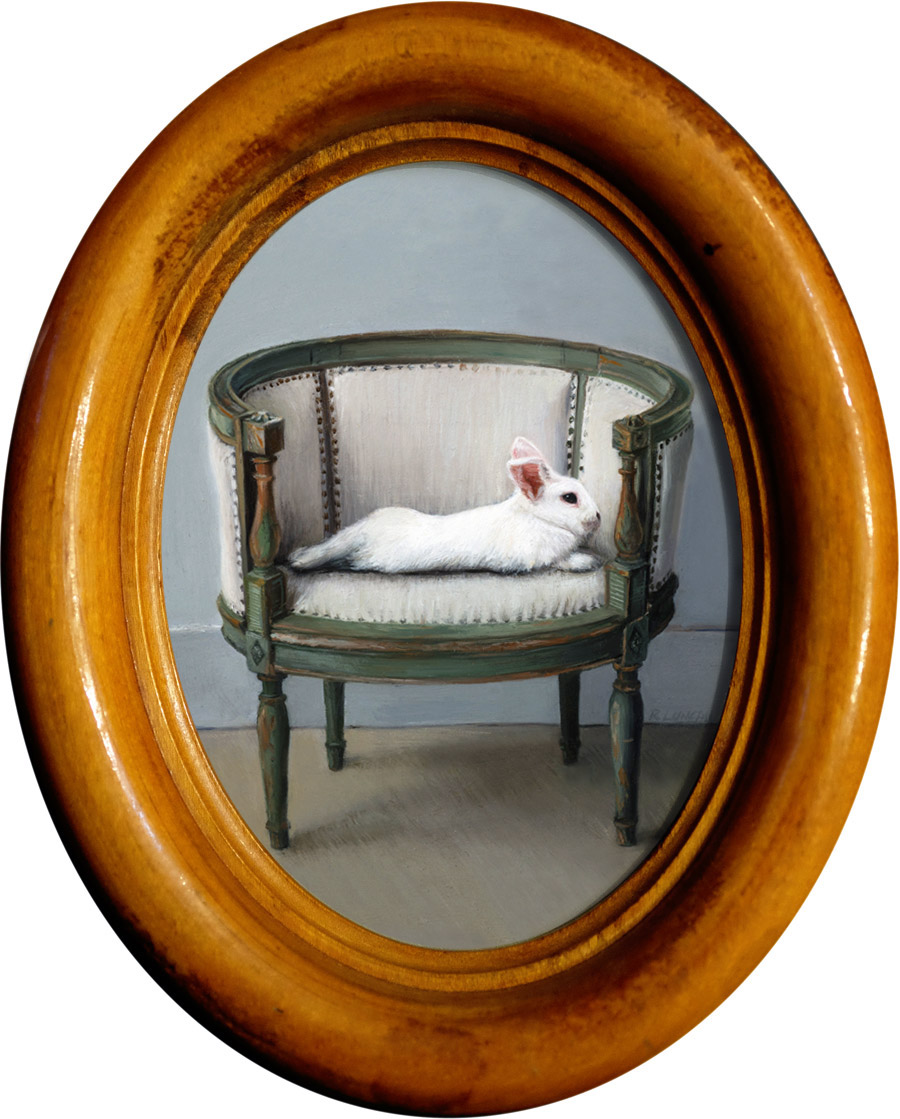
post

Moon Rabbit, A Miniature Oil Painting and My Journey from the Studio to a Land of Myths

The Myth of the Moon Rabbit

As I paint the rabbits in this series of Miniatures, I am also researching their historical role in artwork and mythology. I am especially captivated with the many stories that connect the rabbit with the moon. This month, I am paying homage to this cross-cultural body of mythology.

Busy Bunny, An Example of Virtue and Hard Work Across the Globe

Rabbits do like to keep occupied. Mine busy themselves remodeling their cardboard condos. But cultures around the world have had different ideas about what the rabbit in the moon might be up to.

Asia

A Japanese story written during the late Heian period (794-1185) has him pounding mochi for rice cakes (you can find the story in the anthology Konjaku Monogatarishū). In a Chinese story, he is mixing the elixir of life for the moon goddess Chang’e.

The root of those and other Asian myths is the Buddhist story from Jataka tales (Tale 316),

circa 4th century BCE. The tale opens with the deity Brahmā (Hindu god of creation), coming to the Earth in disguise as an old man. When he begs for food, four animals offer to help: a monkey, an otter, a jackal and a rabbit. The monkey brings fruits, the otter fish, the jackal steals a lizard and a milk-curd for him, but the rabbit only has grass to offer. Knowing that the old man can’t eat the grass, he instead offers himself and jumps into the old man’s fire. The deity then reveals himself and quenches the fire before the rabbit is burnt. He is so touched by the virtue and self-sacrifice of the rabbit that he carries him to the heavens, leaving his likeness upon the moon to remind us of his noble example.

South America

From the opposite side of the globe, a similar Aztec myth features the god Quetzalcoatl, who makes a journey on the earth as a man and finds himself unable to find food or water after walking a long way. Just when he thinks death is certain, a nearby rabbit offers herself as food to save his life. Moved by the rabbit’s offer, Quetzalcoatl elevates her to the moon, then lowers her back down. Her shadow remains on the moon for us to remember how a little rabbit touched the heart of a god.

Adventure and Fertility

And other myths connect the rabbit with the moon as well. Native American (Cree) myth describes the rabbit as an adventurer that visits the moon with help of a friendly crane. In Chinese folklore, the rabbit is so prolific that they can conceive with just the touch of moonlight.

My Muse, the White Rabbit

Rather than feature my rabbit in her ‘natural environment’ (i.e. the painting studio), this month Eleanor dashes into a romantic, otherworldly nighttime scene inspired by German Romantic painter Caspar David Friedrich. I am studying his work for a series of portraits, and his dramatic cliffs made a home first in my imagination, and now in this latest miniature.

My Ellie has been fixed so she won’t be doing any reproducing, moonlight or not. I also have my doubts that she’d impress the gods with shows of selfless generosity. Stealing her brothers treats is one of her favorite pastimes. In this painting, though, she is my Moon Rabbit, running wild and free. Who knows how far she can go!

Though the original painting is sold, you can still get greeting cards of all of the rabbit Monthly Miniatures in the series in my Store.

Visit Rebecca in the Studio!

Seattle independent filmmaker Aaron Bourget has edited a video from a recent visit to the painting studio.

It’s difficult to be in front of a camera (especially when 6 months pregnant!) and Aaron really helped make me feel more comfortable. I hope you enjoy this glimpse into what’s hanging in the studio, and what I’m working on!

Thank you Aaron!

The Business of Art, 2015 Retrospective Part 1 of 3: Planning Paintings


Monthly Miniatures - Rabbit oil paintings by Rebecca Luncan

Monthly Miniatures – Rabbits

Planning and promoting artwork: strategies that helped me focus and make decisions in 2015

In 2015 I made a big push to get my art out into the world, and my approach to both making and selling art is more structured than ever before. In the studio, I have been planning and tracking what I’m working on more than ever before. As for selling, I began to promote my art across several channels, all new in 2015: this blog, a newsletter, Instagram, Facebook, and several non-digital efforts.

In this three-part series, I’d like to talk about how these strategies have worked throughout the year, and how they all relate to help my achieve my artistic goal: make good paintings and make a living doing what I love. 

Scheduling, deadlines, and staying motivated

In January 2015, I blocked out the entire year, month by month, to establish deadlines for each painting I wanted to finish. During the long process of completing a painting, it is easy to get sidetracked thinking about the next project. But I always love starting something new, and having a schedule in place helps me turn my excitement into motivation. So instead of being distracted by what’s next, I can really focus on finishing what’s in front of me. When I can stay motivated to finish my current work and be excited to start the next piece, then I can make a lot of art!

At the same time, I publish a newsletter each month. Since my newsletter is specifically about the work I’ve made in that month (and secondarily about blog posts I’ve written), I can’t write a newsletter without finishing the painting I’ve planned. Because people expect their newsletter each month, social expectations also help stay accountable and motivated to keep up with my schedule.

Rabbits! A strategy for audience engagement

It takes a tremendous amount of time to put together an art show, thousands of hours over the course of several months or even years. And between shows, people forget your name! I really wanted people to see my work on a more regular basis and I needed some regular structured deadlines, so I started my first Monthly Miniature series. I love miniature paintings, and the idea was to make smaller works more often, so I could share them on my newsletter and social media.

My first Monthly Miniature was my studio rabbit Eleanor, but I had not planned to keep painting rabbits. I soon realized there was a real advantage in sticking to one particular theme. A focused theme for the series help me push myself to developed the series in a deeper way and it also makes it easier for you to look at my work as a whole and understand where I’m coming from. When I showed my (often already sold) painting to people and they were interested, I could refer them to the Newsletter, where they would see next month’s rabbit miniature before anyone else.

Featuring the same subject each month also helped me connect with my audience over time. People actually got to know my rabbits and care about them. I keep in touch with my core audience via my newsletter, where I like to share a little bit about what goes on around the studio. I talk briefly about my life, show off my recent work, and always share a little bit about the rabbits. I love it when people respond to the newsletter and we can start a conversation. If I painted and talked about something different each month, people could not connect the same way with my work.

The layers of my art-making cake

Each rabbit miniature takes a little over a week of my art-making schedule. I love painting Charlie and Ellie, and because of the nature of the series and the way I’ve planned them, they’re getting the most public attention right now, especially in my newsletter. I do however, spend more of my painting time keeping up with commission orders, which typically take three weeks or more and working little by little on the larger figurative paintings that help me explore and develop my art.

It helps to have clear priorities for when my schedule becomes tight (and it’s always tight!). I try to start my commissions early so I have a good idea of how long they will take me (every painting is a new challenge). The firmest deadlines come first, so finishing commissions on time is top priority, followed publication deadlines: Monthly Miniatures, blog and newsletter articles. Finally when I have time left over, my original figurative works get some attention.

Leaving time for reflection, and recording progress

Looking back it’s clear, if it doesn’t have a deadline, it doesn’t get done around here, so planning ahead is pretty important. But it’s not possible to plan perfectly, so some flexibility is necessary. It can be tough to be flexible without losing respect for deadlines. It helps to actually set aside time to think about what’s working and what’s not, to recognize that the deadlines are important, but what ultimately matters is the greater goal. It is important to set aside time to reflect and formally revise plans.

To reflect effectively about what happened, it really helps to know what did happen. That is why I record my time for everything I work on. I might go into detail on that in the future, but basically I write down the hours I work on each given project. It is hard to understand why that is important without actually doing it, but not only does it give me information about what I have done, it helps teach me how to better plan in the future. Without that experience, it would be impossible for me to know, for instance, whether I can finish a last-minute commission by Christmas (when it’s already October).

My reflections on 2015’s art-making plans

2015 was a great year, and I met a lot of goals. I did a lot of painting, including several great commissions, and expanded my audience. I finished every painting that I built into my original timeline, and I even finished a few small experimental paintings. But the larger figurative paintings that I feel are so important to my work and my career, because they were not scheduled with a firm deadline, always got put off so that during 2015, I finished exactly one!

2016 will be a very busy year for me. I have another series of Monthly Miniatures planned, as well as an almost-full schedule of commissions. But it is really critical that I finish some of the larger figurative works left on the back-burner from last year, because in art it is very important to get recognition: articles, awards, and shows or representation. The majority of my work could not be shown last year: both commissions and Monthly Miniatures get sent off to their owners as soon as they are done and photographed.

Having built up a modest audience this year, it is time to work towards some shows and awards. This year two new strategies will help me do that. First, I will collect the new Monthly Miniatures and show them all together, before sending them to their owners. And since I find it is critical to set deadlines for those larger works, I built larger gaps into my commission schedule this year and bookended them with deadlines for large figurative paintings!


Rebecca Luncan Instagram account

Part 2 of 3: Communication

Facebook original painting auction

Part 3 of 3: Selling Artwork


Charlie Poses as Peter Rabbit for January’s Monthly Miniature Painting

rabbit oil painting peter

Charlie as Peter Rabbit – January 2016, oil on aluminum, 4″ x 5″

Charlie posing on a garden path one sunny day last spring reminded me of the story of Peter Rabbit.


Rabbits are very curious creatures, and exploring (and getting into trouble) is just part of being a rabbit. I listened to an audiobook of Peter Rabbit to inspire me when I started the series and Charlie must have been listening too to strike such a pose after knocking over the watering can.

Charity Auction for December’s Monthly Miniature Rabbit Painting


Snow Rabbit In progress oil painting

Snow Rabbit – December, 2015 in-progress, 5″ x 3.75″, oil on aluminum

Get your bidding cards ready, this painting is going up for auction December 7th!

Painting the Monthly Miniatures has been an amazing journey. Each month I’m creating one new painting of my rabbits, and I love how each new painting ends up inspiring new ideas for the next two or three paintings.

I’ve been humbled by all of the support from everyone out there. Each painting has sold, most within 24 hours of being released (sometimes in minutes!). For the paintings to go to loving homes is such a huge blessing. My heartfelt thanks to all you Monthly Miniature owners out there.

Why an auction this month?

First, since they’re selling so quickly, I thought it would be nice to give more people the chance to purchase one of the little paintings.

Second, I’d like to engage my audience and get more exposure. I love painting, and the more people that know I exist, the better for my art career. So please spread the word!

Third and most important, 50% of the sale price of this painting goes to two local nonprofits who helped my rabbits and their litter mates. Read the story of my two long-eared muses and how Special Bunny and Seattle Animal Shelter Foundation helped them come into my life on my last blog post.

How to bid?

Bidding will be simple and take place on Facebook (but I will do my best to accommodate anyone interested who does not have an account). Bids will be entered directly in reply to a post featuring the finished and framed painting. It will be live for about a week, Monday December 7th at 8AM PST to Sunday December 13th at 5PM PST. Bidding instructions will be found under the “Notes” tab on Facebook, but basically each bid will look like:

Bid $100

If you are the winning bidder, please confirm your method of payment within 48 hours of winning the auction. I would like to get the painting shipped as soon as possible!

No Facebook account or want to be anonymous?

If you don’t have an account or if public bidding will ruin a surprise (or it’s just not your thing), contact me with your maximum bid, and I’ll post for you, complete with an Anonymous Bidder Codename. I will periodically update the leading bid by increments of $10, up to your maximum bid, and send you an update email if you aren’t on Facebook.

Payment Method

Paypal is easy for most people, but I happily accept checks and credit cards. Just make sure I have a current email and mailing address for you, and confirm your method of payment within 48 hours of winning the auction. If paying by check, make sure to get it to me within five business days to keep your winning bid status.

Will I continue to do auctions?

If all goes well, I may do another one next December, but expect all the future monthly Miniatures (at least January – November) to sell directly from the website as usual.

Questions?

If I seem to have missed something important, please contact me. Thanks for you interest, and happy bidding!


An Unexpected Litter of Rabbits: The Story of Charlie and Ellie

Mother Rabbit

Mother Rabbit

The two rabbits that continue to inspire my paintings came into our family unexpectedly. But that never could have happened without the hard work of one dedicated woman and the generosity of two local organizations.

As we enter the holiday season and I finish up my ninth Monthly Miniature, I want to tell the story of how my models and their litter mates came into the world and found homes. Because without the dedication of some compassionate souls, Charlie and Ellie might not be with us today.

Charlie and Ellie came to us through my mother-in-law. She is an amazing woman. She has worked with animals for years, nursing and rescuing furred and feathered fauna of all sorts. From sleeping in the barn for days on end to be on hand for birthing lambs, to rehabilitating opossums in her bathtub, she does whatever it takes to help an animal in need.

If you went looking for Margot just before sunrise about two years ago, you would find her feeding her herds of goats and sheep, three horses, several cats and dogs, and her little black and white Dutch bunny Zorro. Rabbits are very social and Zorro lived alone, so when Margot’s friend Stacey discovered a large white rabbit hiding out in her backyard, Margot jumped at the chance to give him a companion. They figured the white rabbit was a pet that had been let go. Rabbits can be harder to keep than people expect, so they often get “released into the wild,” but sadly most don’t make it long.

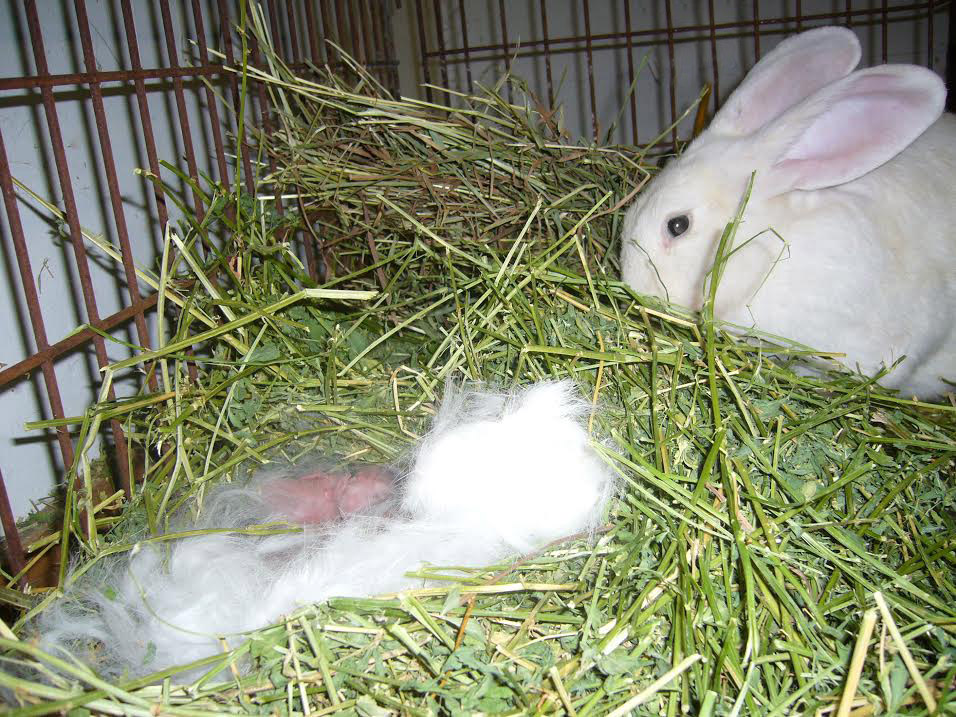
It took Stacey two weeks to catch the rabbit, but when she did Margot drove over right away to pick it up. She set the newcomer’s cage beside Zorro’s for them to meet, and then went to the feed store to buy supplies. When she came home thirty minutes later, she noticed the new cage was carpeted with quite a lot of fur. Upon closer inspection, she found she had not rescued just any rabbit, but a mother rabbit! Nine blind, pink kittens (as baby bunnies are called) lay sleeping in a little furry nest. If you recall the number of animals already on her small farm, you may guess that she loves when babies are born! Taking in one bunny is however, very different from taking in ten bunnies!

Things turned complicated as the bunnies began to grow.
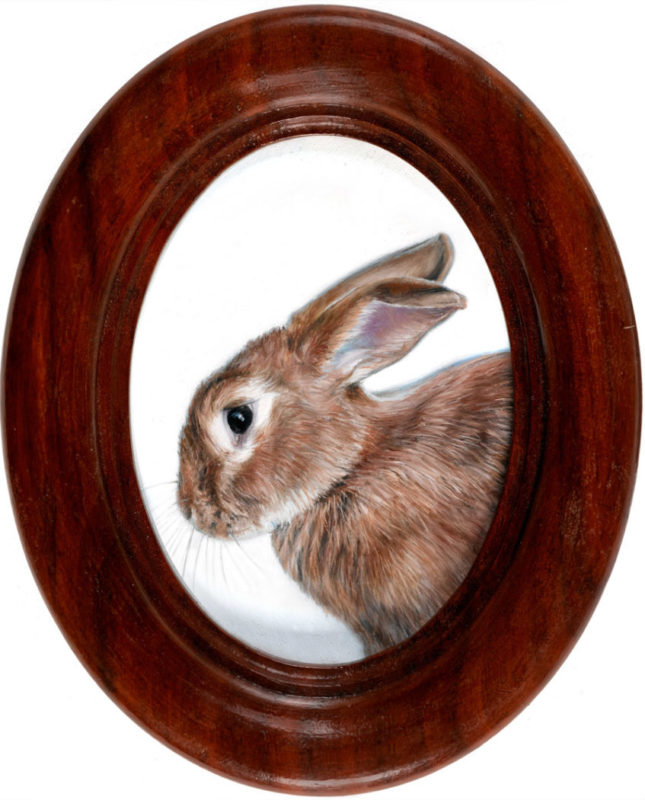
Baby bunny rabbit, Eleanore

Baby Eleanore

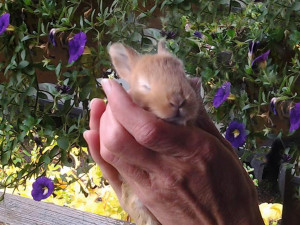
The babies would eventually need homes, and as the tiny newborns grew and their naked bodies got covered in fur, one of the bunnies stayed smooth and naked, she was completely hairless! Despite jokes about knitting tiny

bunny sweaters, we were worried. Such hairless bunnies often don’t survive. Three of the other little kittens didn’t make it to this stage, and Margot worked hard to keep all the surviving six healthy.

As their eyes finally started to open, Margot noticed that one kitten preferred to keep one eye closed. The little brown bunny’s eyelid was slightly inverted, making her eyelashes poke into her eye. It’s an extremely painful condition and will result in blindness if untreated. There is a surgery to fix it, but it’s quite expensive. A Seattle-area organization, Special Bunny came to the rescue. Not only did they raise the money for the entropion eye surgery and saved the little brown rabbit’s eyesight, they kept her and also took in two more white bunny siblings and found them all happy homes.

Margot decided to keep the hairless bunny (called Bunsy Bigglesworth) even if it meant taking up knitting tiny sweaters. But after a few more weeks, Bunsy miraculously sprouted a coat of soft fuzzy fur! And the fuzz soon thickened into a full coat of white fur, only extra soft.
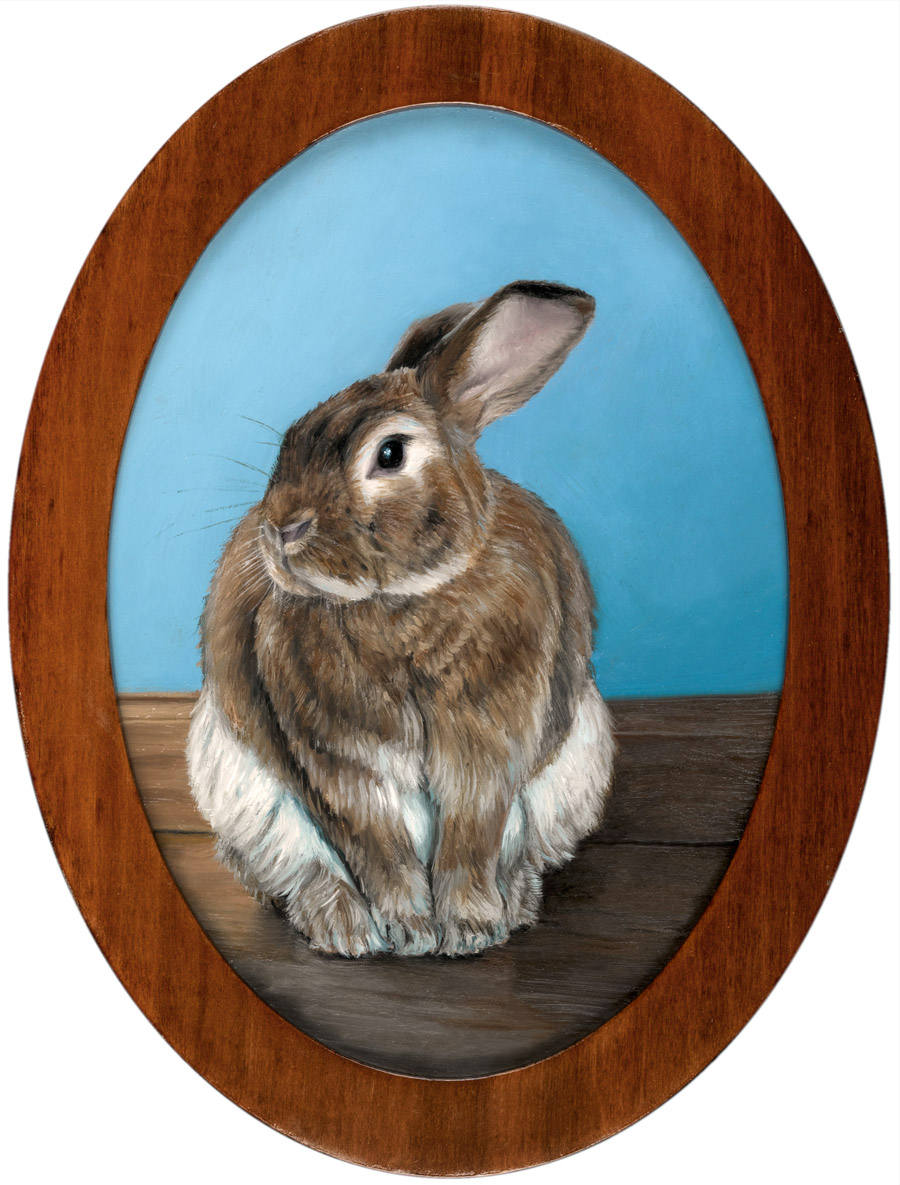
baby bunny rabbit

Baby Charlemagne

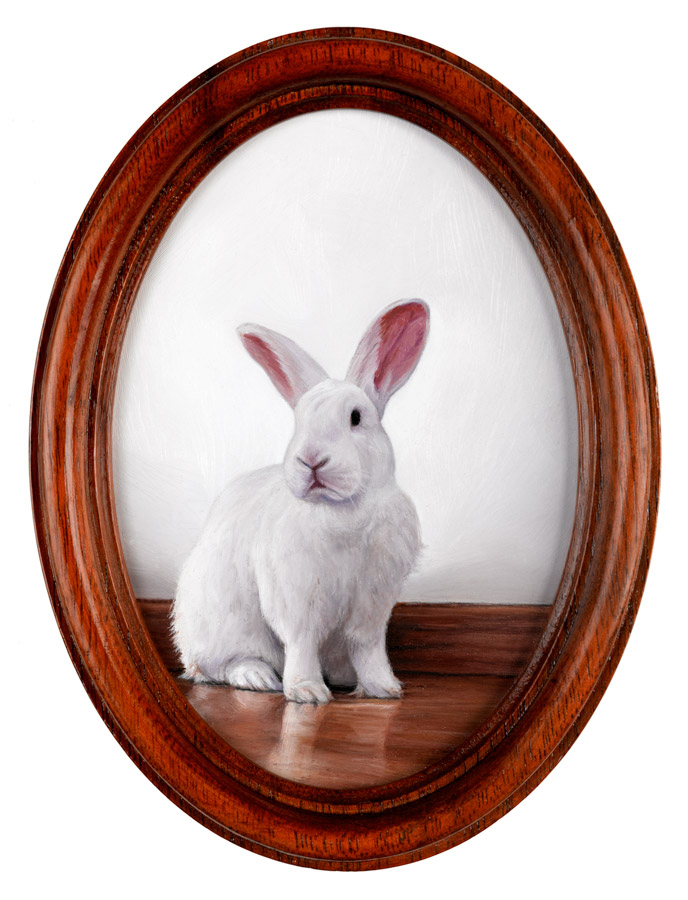
The last two of the litter are of course my Charlemagne and Eleanor. I had rabbits when I was a kid and I had been wanting house rabbits for years. Two years later, my rabbits live a very spoiled life. They have the run of the house, pose for paintings, and occasionally venture into the garden to play.

Zorro recently passed on, but his remaining years were much happier with his two pretty companions, Miss Tribble and her uncommonly soft daughter Bunsy Bigglesworth. They share a stall with an old Angora goat Satin, where they dig warrens in their hay bedding. They are very friendly, and come out for treats and visits whenever Margot goes out. I’m not sure where the other three are but I hope they are just as happy and loved as their siblings.

Help Thank and Support Seattle Animal Shelter and Rabbit Haven

We owe a great deal of gratitude to Special Bunny for funding the expensive surgery to save one rabbit’s eye, and finding homes for three rabbits, and to the Seattle Animal Shelter who provided discounted spay and neuter services for Charlie and Ellie, as they do for thousands of animals each year.

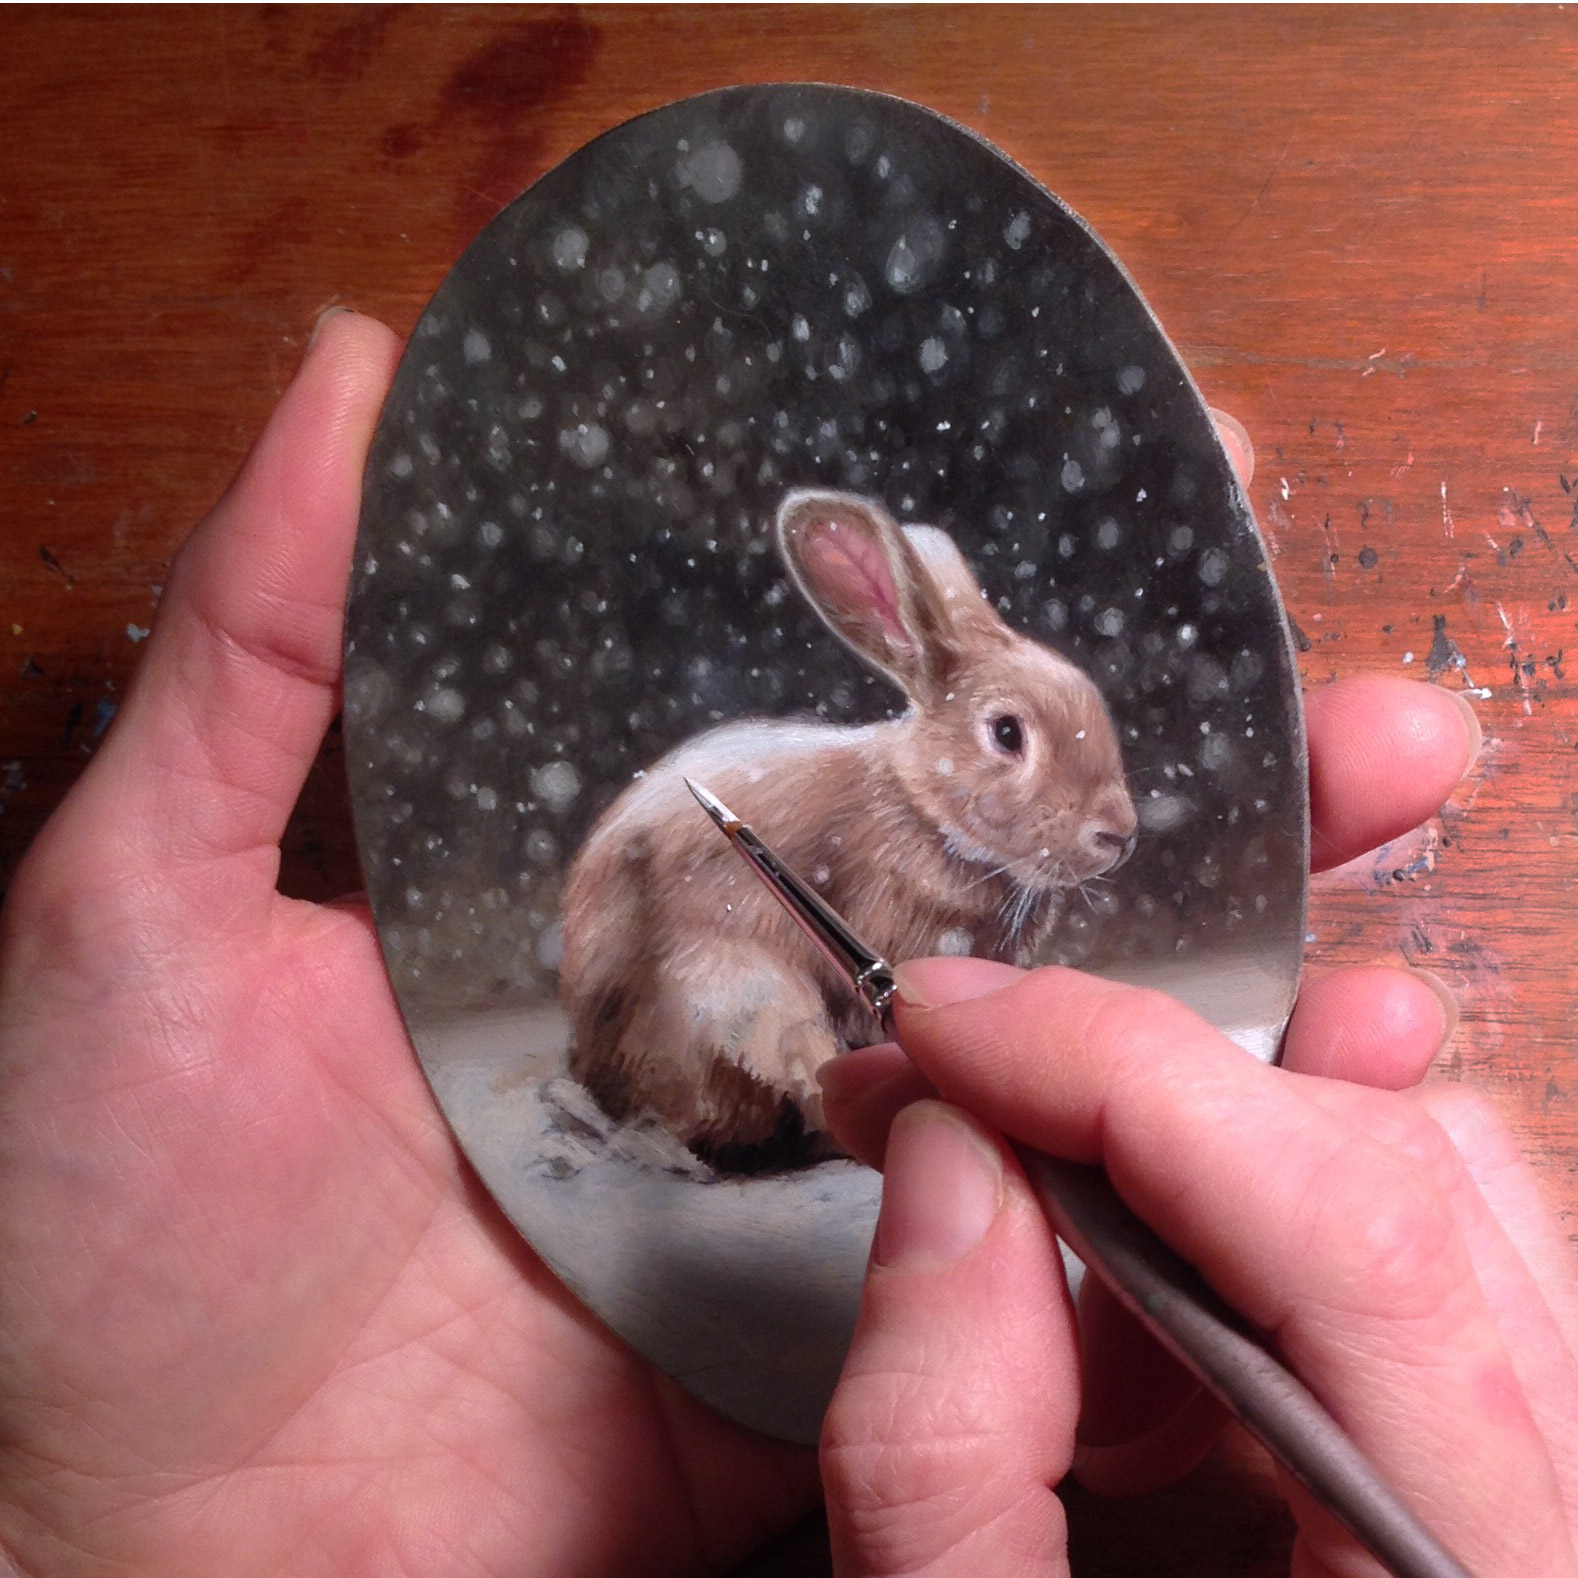
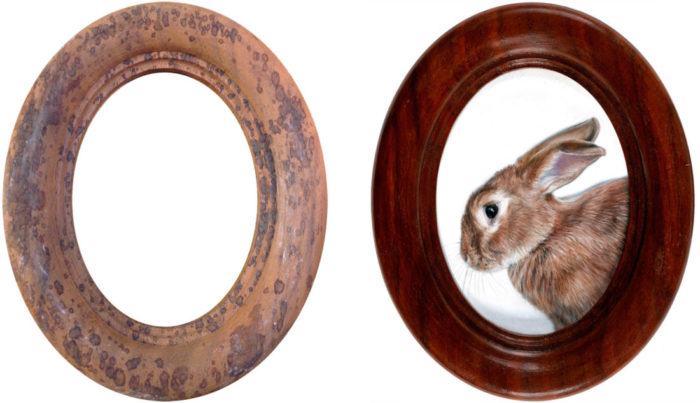
To show our gratitude, half the proceeds of next month’s Monthly Miniature will be donated to the two organizations. The ninth Monthly Miniature is a seasonally-themed portrait of Charlie in the snow, and it will be sold by auction. Bidding will open on December 7th and will close at 5:00 PM Pacific time Sunday, December 13th. Please consider bidding generously, not only to support me as an artist, but also to help support these wonderful organizations. Check back next week for auction details, and follow me on Facebook, where the auction will take place!

specialbunny.org            


Packing November’s Reclining Rabbit Painting for her Cross Country Journey

Reclining Rabbit oil painting miniature by Rebecca Luncan

Reclining Rabbit – November 2015, oil on aluminum, 4.25″ x 3.25″

I’m a huge fan of miniature artwork, and the ease and affordability of shipping them safely is one reason why.

Miniature paintings are great for so many reasons. They are intimate and powerful, easy to hang in any house, and much more affordable to commission than larger works (even with a custom, hand-finished frame).

And while miniature paintings are cheaper and easier to ship than larger artwork, they also need some special treatment.

Medium-sized paintings typically ship wrapped in plastic and 2″ of bubble wrap surrounded in a cardboard exterior . That will normally be enough for small miniatures as well, but because the packages are small, they are more likely to get tossed around, stacked, and generally treated roughly.

Years of working in a museum have trained me to go the extra mile in prepping artwork for shipping.

Here’s how I packaged this miniature painting to ship across the country to her new home.

Art packing materials

Art packing materials

Materials

  • 2.25″ grey foam *sub wadded brown paper for more environmentally friendly packing
  • Ethafoam (Styrofoam can also be used) the thickness of the artwork (you can glue multiple layers together)
  • plastic bag (polyethylene or food grade)
  • tape measure
  • packing tape
  • straight edge
  • “fragile” sticker
  • utility knife (I like Olfa)
  • cardboard (box)

Step-by-Step

  1. Determine what size box is needed. Measure the painting and add 4″ to get the length and width. Stack your grey foam, Ethafoam and one layer of cardboard, then measure to get your box’s ideal height. *I’ve been subbing brown paper for the grey foam more recently to make my packing materials more environmentally friendly. If you do this, leave two inches of space for both above and below your artwork and use double thick cardboard. Add a second layer of cardboard under your artwork.
  2. Find or cut out the box. A box that is within a few inches (but at least 2″ larger on all sides)

    of the painting is ideal. The height should be trimmed to fit the height of the foam exactly. If you don’t have a box handy, you can make your own: the image above shows how you would cut a box from a flat piece of cardboard. To get the creases for the bends, use a bone scorer or completely retract the blade on the utility knife and use the (dull) metal edge. Tape the bottom of the box together.

  3. Cut each piece of foam and cardboard to fit. I also like to take out a corner notch in the top layers to make unpacking a little easier. My favorite knife is the Olfa utility knife with a 25mm blade. Fantastic knife for cutting foam (and everything else). Make sure to keep your fingers out of the way of the blade, these knives are incredibly sharp!

  4. Cut a hole in the Ethafoam that will snugly fit the painting.
  5. Wrap the painting in plastic, making sure to seal the

    edges completely and that the surface of the painting does not come into contact with the plastic. If the painting is unframed and very dry, wrap

    with Dartek first, then plastic.

  6. Phew! Everything’s cut and now it’s time to put it all together.
Packing miniature paintings, step by step

Packing miniature paintings, step by step

7. Remember to add the packing slip and a thank you note, then say your goodbyes and seal it all up. Make it official with a fragile sticker, and it’s ready to post out to it’s new home!

Ship-Finished

If you’re interested in receiving your very own hand painted miniature, contact the artist to commission one just for you or sign up for the monthly newsletter for a preview of the newest painting up for sale!

Rabbit Greeting Card Giveaway: the Monthly Miniature Series is Half Finished!

Rabbit_greeting_Cards

Celebrate with me!

I’m pleased to say I’m halfway through my “Monthly Miniature – Rabbits” project. I’ve printed greeting cards of all six paintings to mark the occasion, and now I want to give some away! The first six subscribers that reply to the September Monthly Miniature Newsletter will get a set of cards for free, so check your inboxes! If you miss your chance, don’t worry, you can purchase them from my site starting September 7th.

I’ve thoroughly enjoyed making these paintings, and I’m excited for the next six. It’s amazing how there’s always something new to explore within such a narrow focus. The project so far has been really inspiring for me, and I’m brimming with ideas for the miniatures. I’ve also been dying to do some larger paintings of the rabbits, like a giant portrait of Charlie that will have to come into the world one day. But for now, the little ones will keep coming, once a month, as promised.

Thanks for following the Monthly Miniatures. And if you aren’t already on my newsletter, please sign up!

post

Antique Frame Transformed for the August Monthly Miniature with French Polish

The discovery and restoration of a meticulously crafted, one hundred year old frame for Charlemagne in Profile

My sister is passionate about antiques. Most weekends will find her traveling to different auctions, estate sales, and antique shops, on the hunt for something unusual that catches her imagination. About a year ago, she called me up, excited about a sale of wooden frames produced by the The Castner Picture Frame Company in the early 1900’s. The company meticulously produced frames from scratch for more than a century before shutting down. The Mohawk Building in Cincinnati was left with thousands of uniquely designed frames ranging drastically in size and level of detailing. Wooden frames aren’t a rarity, but wooden miniature frames most certainly are, and here they had them them in abundance!

We excitedly talked on the phone and texted back and forth as the date of the sale approached, and she ended up buying around 60 small frames. I was mostly interested in small circular frames, but thankfully, she couldn’t pass up some beautiful wooden ovals as well. Most of the ovals are unfinished, while the circular frames are almost all primed for painting or gilding. What a rare opportunity! They clean up beautifully, and I’ve treasured each one as I painted or polished it to fit portraits of people and rabbits.

All of the rabbit monthly miniatures are framed in one of these frames, but I chose to highlight this one in particular because the transformation was so dramatic. It was so dirty and covered in mysterious spots that I had little hope in finishing it, but as I worked, the spots disappeared, and the grain became richer and more beautiful with each step of the process. It’s my favorite so far, and I chose to use if for this minimal painting of Charlie, the simple white background allowing the frame to shine.

French Polish: Step-by-step

French polishing is a technique of finishing wood with shellac as the main ingredient. This technique was popular in the late 1800’s for furniture but it is often overlooked in contemporary furniture finishing due to it’s low resistance to damage from water and heat as well as its labor intensive application process. It is still a favorite for musical instruments because of it’s unique ability to be be applied effectively in extremely thin coats leaves musical instruments with a nice clear sound. Many fine woodworkers also continue to use it, especially on antiques because the rich depth of the finish is difficult to rival with modern materials. As my frames shouldn’t come into contact with either heat or water, it’s an ideal finishing process for me.

Materials

  • shellac*
  • pumice
  • Renaissance  wax
  • denatured alcohol
  • cotton batting (or cotton balls)
  • soft cloth or cheesecloth
  • sandpaper (280, 320, 400 and 600 grit)
  • 2 cheap 1″ – 2″  brushes
  • walnut or olive oil
  • dust mask

*I’m using a premixed solution but you can buy shellac flakes and dissolve it yourself

Step One: Clean

Clean the surface with denatured alcohol and a soft cloth.

Step Two: Sand

Sand the frame with progressively finer grits of sandpaper (starting with 280 and progressing to 600).

Step Three: Rub with Alcohol & Pumice

Make a fad by wrapping your soft cloth or cheesecloth around a wad of cotton that has soaked in alcohol. You can now sprinkle a bit of pumice on the frame, making sure to wear your dust mask. Rub the frame vigorously with the fad, and if it starts to catch on the grain, add a drop of oil.

Step Four: Rub with Shellac

Make a new, second fad, this time soaking in shellac instead of alcohol, and again rub vigorously with as random a pattern as possible. Reapply shellac to the inside of the fad (by dipping the cotton ball) as needed.

Step Five: Repeat, then Dry

Repeat steps three and four a few times, letting it dry for several hours between coats. Pay careful attention that you don’t get too much shellac building up on ridges and valleys of the frame, as you will want these details to stand out. The process of working the abrasive pumice and shellac alternately is called the “British Method” of French polishing. The alternative, using both the shellac and abrasive at the same time is the original, or “French Method”.

Let dry overnight.

Step Six: Final Rub with Alcohol

Make a new fad using just alcohol, and gently glide it over the surface. You want to remove any oil that may be on the surface and even out the final coat of shellac. Don’t press so hard that you begin removing the shellac, however. At this point, the frame just glows, and it’s hard to stop touching the silky-smooth surface. But stop touching for now, and leave it overnight.

Step Seven: Wax and Buff

Brush on a very very thin coat of Renaissance wax. Let it dry for 10 minutes, then buff it off with a clean cloth or a stiff brush. Give it another 24 hours to dry and your frame is finished! Now you can touch it.

Finishing miniature frames

Shellac: Yes, it’s made from bugs!

The critical material for a french polish is shellac. Made from lac, an amber colored resinous material produced by the female Kerria lacca insect, which forms a tunnel around the insect and serves as a kind of cocoon to incubate the eggs she lays. Shellac is a non-toxic material that’s even rated as food-safe by the FDA and has a plethora of wide-ranging uses. Not only to be found in furniture, it can also be found on your jelly beans, guitar, and in nail polish. It’s relatively easy to harvest by scraping it off the bark of the trees, and refining can simply be done by heating it over a fire then filtering once it liquefies to remove any stray insects or bits of bark. It has been used for centuries to polish furniture in the native countries of these insects, Thailand and India. The french polishing technique, which became prominent in the 18th century, is still commonly used to polish furniture and musical instruments throughout the world today.

Rabbit oil painting miniature by Rebecca Luncan

Charliemagne in Porfile
oil on aluminum
3.75″ x 2.75″

Phthalo: the Forbidden Blue (July Monthly Miniature)

Rabbit Painting Miniature Rebecca Luncan

My fourth Monthly Miniature is featured with a phthalo blue background, a color long excluded from my palette.

How embarrassing that I was afraid of a tube of paint. I like to think of myself as not really afraid of anything, but I gave my last tube of phthalo blue away many years ago because I was afraid it would invade my paintings.

Phthalo blue is a relatively new pigment, accidentally discovered and rediscovered in the lab before its potential was finally recognized by the company Scottish Dyes in the early 1900’s. It was introduced as an artist pigment in the mid 1930’s and has been highly valued ever since for it’s resistance to fading, intense color, and high tinting strength.

That high tinting strength is the source of my fears. You have to understand how invasive phthalo blue is: during the course of a painting, hues naturally blend and migrate. While most pigments can be blended into entirely new colors, either dominating and being dominated by other hues, phthalo blue tints so powerfully that it is extremely difficult to blend away in that manner. If it’s on the pallet, I can see it in the painting everywhere! Typically as a figurative painter, creating warm skin tones helps give the person a more vibrant, lively feel, so my general rule has been to only use Cobalt Blue (which has a weak tinting strength) so that the warm tones are easy to pull forward with a greater sense of control. Whereas a tiny bit of phthalo blue on the pallet has a way of invading everything and can quickly force you to scrape your entire palette clean and start again, thus the expulsion of the color from my studio.

Two paintings changed my perspective, and now I can’t imagine working without it.

I spend a great deal of time at the Seattle Art Museum, where I help create mounts that stabilize objects on display and mitigate earthquake risk. And though I’m mostly working with sculptural pieces, I love spending time with the paintings. March of 2014 brought “France: Inside and Out“, an ongoing show in the fourth floor galleries (co-curated by Chiyo Ishikawa and Julie Emerson), and though the portrait below was painted before the advent of phthalo blue, it started me questioning my fear of a dominating cool pigment in a portrait. The blue is everywhere in this painting: the frame, the hair, and the skin, not to mention the blue dress and background. But at the same time, it’s neither monochromatic nor muddy. This painting planted the thought that maybe it’s okay to let go of some control and let the paint surprise me.

Berthe Morisot, Lucie Léon at the Piano, oil on canvas, 1892 Collection of the Seattle Art Museum

Berthe Morisot, Lucie Léon at the Piano, oil on canvas, 1892 Collection of the Seattle Art Museum

That planted thought found unexpectedly fertile ground this February, when my partner Evan and I showed up at his sister Molly’s small farm in Arlington, WA just before dusk. I wanted to begin a series that actively connected the figure and landscape, and we had come to gather images. The winter fog rolled into the valley, across the fields, and all around the trees, barns, and all of us. The sun had begun to set, turning the foggy hills a deep and vibrant blue, and mysterious lights haunted in the distance. As a subject, Molly is as dramatic as the background that evening, and as we finished, I couldn’t wait to begin the new series.

But as I began to paint, I tried blue after blue but none of them worked. Nothing came close to the shockingly blue sky we had witnessed. I finally conceded that I needed phthalo blue, and I bought my first tube of it in over 10 years. It delivered where other blues had fallen short, and although I only used it in the background in this painting, it helped me shake off some of my longtime inhibitions. In my fourth Monthly Miniature, I also used phthalo blue, and if you look closely, I have used it much more freely, adding it to the floor and the figure. Adding it in the highlights in Charlie’s soft belly fur was truly freeing and a moment of joy. Instead of fearing the phthalo invasion, I invited it in and listened to what it had to say. I’m pleased to say it had some nice ideas, and we’ll be working together again soon.

Portrait oil painting Rebecca Luncan

Vigil, Oil on Aluminum panel, 15″ x 15″, 2015